аЯрЁБс>ўџ ўџџџџџџџџџџџџџџџџџџџџџџџџџџџџџџџџџџџџџџџџџџџџџџџџџџџџџџџџџџџџџџџџџџџџџџџџџџџџџџџџџџџџџџџџџџџџџџџџџџџџџџџџџџџџџџџџџџџџџџџџџџџџџџџџџџџџџџџџџџџџџџџџџџџџџџџџџџџџџџџџџџџџџџџџџџџџџџџџџџџџџџџџџџџџџџџџџџџџџџџџџџџџџџџџџџџџџџџџџџџџџџџџџџџџџџџџџџџџџџџџџџџџџџџџџџџџџџџџџџџџџџџџџџџџџџџџџџџџџџџџџџџџџџџџџџџџџџџџџџџџџџџџџџџџџџџџџџџџџџџџџџџџџџџџџџџџџџџџџџџџџџџџџџџџџџџџџџџџџџџџџџџџџџџџџџџџџџџџџџџџџџџџџџџџџџџџџџџџџџџџџџџџџџџџџџџџџџџџџџџџџџџџџџџџџџџџџџџ§џџџўџџџўџџџ  ўџџџўџџџџџџџџџџџџџџџџџџџџџџџџџџџџџџџџџџџџџџџџџџџџџџџџџџџџџџџџџџџџџџџџџџџџџџџџџџџџџџџџџџџџџџџџџџџџџџџџџџџџџџџџџџџџџџџџџџџџџџџџџџџџџџџџџџџџџџџџџџџџџџџџџџџџџџџџџџџџџџџџџџџџџџџџџџџџџџџџџџџџџџџџџџџџџџџџџџџџџџџџџџџџџџџџџџџџџџџџџџџџџџџџџџџџџџџџџџџџџџџџџџџџџџџџџџџџџџџџџџџџџџџџџџџџџџџџџџџџџџџџџџџџџџџџџџџџџџџџџџџџџџџџџџџџџџџџџџџџџџџџџџџџџџџџџџџџџџџџџџџџџџџџџџџџџџџџџџџџџџџџџџџџџџџџџџџџџџџџџџџџџџџџџџџRoot Entryџџџџџџџџ РF`E•Ћц5П€WordDocumentџџџџџџџџ 7CompObjџџџџџџџџџџџџnџџџџџџџџџџџџўџџџџџџџџџџџџџџџџџџџџџџџџџџџџџџџџџџџџџџџџџџџџџџџџџџџџџџџџџџџџџџџџџџџџџџџџџџџџџџџџџџџџџџџџџџџџџџџџџџџџџџџџџџџџџџџџџџџџџџџџџџџџџџџџџџџџџџџџџџџџџџџџџџџџџџџџџџџџџџџџџџџџџџџџџџџџџџџџџџџџџџџџџџџџџџџџџџџџџџџџџџџџџџџџџџџџџџџџџџџџџџџџџџџџџџџџџџџџџџџџџџџџџџџџџџџџџџџџџџџџџџџџџџџџџџџџџџџџџџџџџџџџџџџџџџџџџџџџџџџџџџџџџџџџџџџџџџџџџџџџџџџџџџџџџџџџџџџџџџџџџџџџџџџџџџџџџџџџџџџџџџџџџџџџџџџџџџџџџџџџџџџџџџџџџџџџџџџџџџџџџџџџџџџџџџџџџџџџџџџџџџџџџџџџџџџџџџџџџџџџџџџџџџџџџџџџџџџџџџџџџџџџџџџџџџџџџџџџџџџџџџџџџџџџџџџџџџџџџџџџџџџџџџџwidth="18" height="13"> Click once on the WINS Configuration tab.

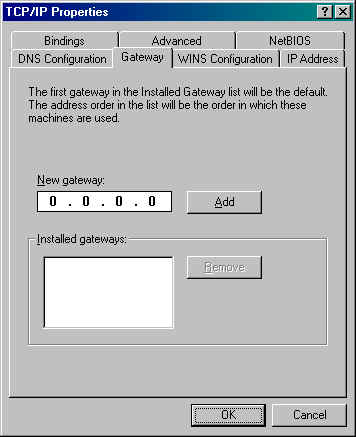
Click on the bullet next to Disable WINS Resolution. Click once on the Gateway tab.

Enter the Gateway address for your account into the New Gateway box and then click the Add button. Since each account has a unique Gateway you should call us at (612) 882-2990 to obtain the correct numbers for your account. Click once on the DNS Configuration tab.
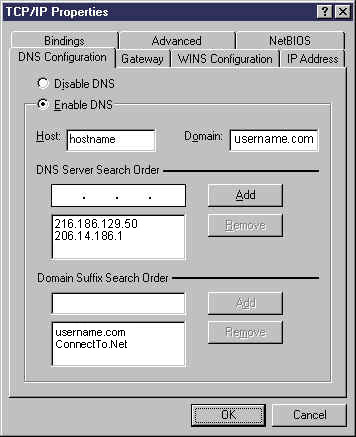
Click the bullet next to Enable DNS
In the Host: box type in your hostname (You should call us at (612) 882-2990 to obtain the correct host name for your account)
In the Domain: box type in swdata.com
In the box under DNS Server Search Order, type in 208.142.244.2 and click the Add button. You should now see that address in the list of installed DNS Servers. Enter the number 208.142.244.17 into the box and click Add again. You should now have both DNS Servers listed.
In the box under Domain Suffix Search Order, type in swdata.com and click the Add button. You should now see that name in the list of installed Domain Suffixes. Enter mninter.net into the box and click Add again. You should now have both Domain Suffixes listed.

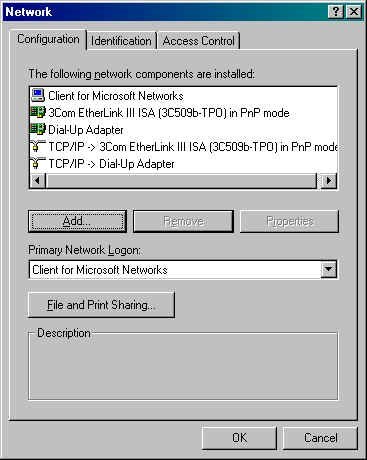
Click OK to return to the Network window. Click OK to close the network control panel and save the settings.
Click Yes when asked if you would like to restart your computer now.

When your computer has rebooted, you should be able to use your new DSL internet connection.

If you have problems with Internet Explorer or Outlook Express or another internet application trying to dial an internet connection instead of use your DSL connection you should do the following:

For Outlook Express:
Click on Tools and then Accounts
Click on the Mail tab.
Click on your email account to highlight it.
Click Properties and then go to the Connection tab.
Click the option Connect Using My Local Area Network (LAN)

For Internet Explorer and other internet programs:
Click on Start then on Settings and then on Control Panel.
Double-click on the Internet icon.
Click on the Connection tab.
Click the option Connect Using My Local Area Network (LAN) №їјљџ45€ЙКђѓ !78mnЪЫ$%žŸёђDE“”фх56…†де#$jkЗИ  7 8 > §ћљїѕѓёяэыщчхуспнлйзегбЯЭЫЩЧХУСПНЛЙЗЕГБЏ­ЋЉЇЅЃЁŸ›™—•“‘]]]]]]]]]]]]]]]]]]]]]]]]]]]]]]]]]]]]]]]]]]]]]]]]]]]]]]]]8мЅe#Р №О7Ю,6l,6l66 6 ЊF(6ь6˜6Tю6FMS Sans Serif Symbol SystemTimes New Roman< ConnectTo-DSL

DSL Setup

These instructions are for the EXTERNAL DSL device model Cisco 675.
Our technicians recommend that you order the external rather than the internal model.
If you have any questions concerning this email support@ConnectTo.net.

     When you sign up for DSL service through US West they will send you a network interface card.  After you have installed that in your computer and have set up the drivers under Windows 95/98, you should have a network neighborhood icon on your desktop.  If you do not have this icon the network card and drivers may not have installed properly and you should consult the documentation that came with the card.  When you have the card installed properly and have the network neighborhood icon on your desktop,  you are ready to proceed to the setup of your network connection to ConnectTo.Net. Please read through these instructions once before beginning the installation process to make sure you have all the information that will be needed to set up your account.

Locate the Network Neighborhood icon on your desktop and click on it once with the right mouse button.
You should now see a menu on your screen and the last option should be Properties. Click on that once with your left mouse button.
You should now have a window similar to the one pictured on the left open. Double click on the TCP/IP -> 3Com Etherlink III located in the list of installed network components.

Note: You may have a different type of Ethernet card installed, if you do, double click the TCP/IP protocol associated with that adapter.

You should now have the TCP/IP Properties window open.
Click once on the IP Address tab.

Click the bullet next to Specify an IP address: and fill in the IP Address and Subnet Mask. Since each account has a unique IP Address and Subnet Mask you should call us at (612) 882-2990 to obtain the correct numbers for your account.

?   Ё   a b Ѕ І ­ Ў Д Е   Œ  з и * + C D K L R S К Л * + { | г д WXЌ­ДЕЛМ !‘ноэюklИ§ћљїѕѓёяэыщчхуспнлйзегбЯЭЫЩЧХУСПНЛЙЗЕГБЏ­ЋЉЇЅЃЁŸ›™—•“‘]]]]]]]]]]]]]]]]]]]]]]]]]]]]]]]]]]]]]]]]]]]]]]]]]]]]]]]]8ИЙ  67>?EFЌ­bcЌ­ДЕЛМ"#’“ЮЯhiЖЗуфыьђѓXYШЩ EF”•туtuТ§ћљїѕѓёяэыщчхуспнлйзегбЯЭЫЩЧХУСПНЛЙЗЕГБЏ­ЋЉЇЅЃЁŸ›™—•“‘]]]]]]]]]]]]]]]]]]]]]]]]]]]]]]]]]]]]]]]]]]]]]]]]]]]]]]]]8ТУbctuШЩZ[ЄЅПР |}ьэ=>QRЁЂАБMNžŸјљLMxyЏАћќLM‰§ћљїѕѓёяэыщчхуспнлйзегбЯЭЫЩЧХУСПНЛЙЗЕГБЏ­ЋЉЇЅЃЁŸ›™—•“‘]]]]]]]]]]]]]]]]]]]]]]]]]]]]]]]]]]]]]]]]]]]]]]]]]]]]]]]]8‰ŠдехцKL˜™ ЁЉЊЋВГДЛМНО§ћљїѕѓёяэыщчхуспнлйзегб]]]]]]]]]]]]]]]]]]]]]]]№јљ5€Кѓ !8nЫ%ŸђE”х6†ењѕ№ыцсмзвЭШУОЙДЏЊЅ ›–‘Œ‡№№№№№№№№№№№№№№№№№№№№№№№№е$kИ 8 ? Ё  b І Ў Е   и + D L S Л + | д њѕ№ыцсмзвЭШУОЙДЏЊЅ ›–‘Œ‡№№№№№№№№№№№№№№№№№№№№№№№№X­ЕМ!‘оюlЙ 7?F­c­ЕМ#“Яњѕ№ыцсмзвЭШУОЙДЏЊЅ ›–‘Œ‡№№№№№№№№№№№№№№№№№№№№№№№№iЗфьѓYЩF•уuУcuЩ[ЅРњѕ№ыцсмзвЭШУОЙДЏЊЅ ›–‘Œ‡№№№№№№№№№№№№№№№№№№№№№№№№}э>RЂБNŸљMyАќMŠецL™Ёњѕ№ыцсмзвЭШУОЙДЏЊЅ ›–‘Œ‡№№№№№№№№№№№№№№№№№№№№№№№№ЁЊЋГДМНОњѕ№ыцсм№№№№№№№№О№ОЮџџџџџџџџ83K@ёџNormala "A@ђџЁ"Default Paragraph Fontаџ@ўџ џџџџ РFMicrosoft Word 6.0 Document MSWordDocWord.Document.6є9Вq